
“The embed form code isn't working on my ASP.NET page!”
This is common problem you may come across if you attempt to put any form inside another form. Even though it is allowed to have multiple forms on page, if we nest one form inside another, it doesn’t work.
This is because nesting of forms is not allowed as per HTML specs (W3 specs).
For asp.net page it is even more strict. Only one form can be run at =”server”. ASP.NET requires the elements to be inside the form, and has the “main” <form> tag on the page. So there is no way to put another one inside of it easily.
What can I do?
It is possible to put the form outside of the “main” form. But … what if your design makes it too complicated and you really need it inside?
Now we offer the solution!
The option called JavaScript Handled Form allows you to put the signup form as a div in your page, along with a small java script which will do the “magic” for you behind the scenes and out of sight.
The script generated for your Opt-In form is created from the configuration chosen by you during the form creation process.
Because this option doesn’t generate an actual “<form> tag”, but creates a div element - which can be placed anywhere.
How can I get this “magic” code?
You need to choose the “Javascript Handled” option when you’re creating your Opt-In forms on the MyBizMailer Platform. (See screenshot below)

After you press “Generate code” you will see that there are two text fields that have now been injected with data. The actual Javascript code and the HTML code to paste into your site.
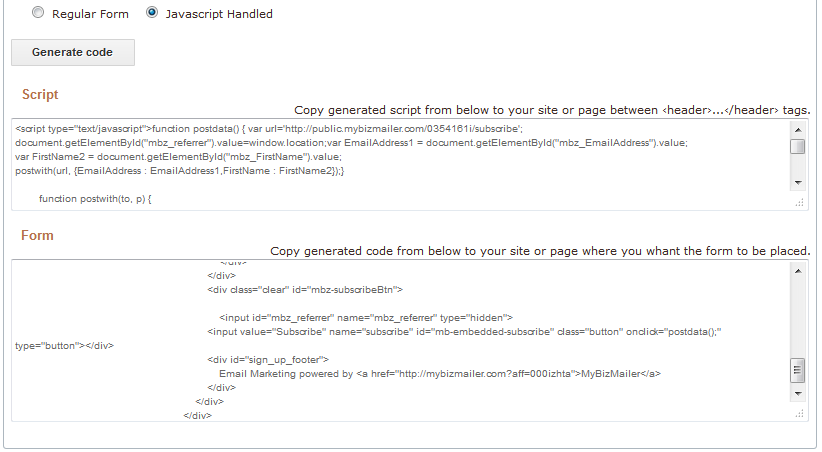
The first section is the “Script” which contains the java script and has to be copied into the <header> area of your site.
The second section is the “Form” element. It contains the Form html mark-up and style. You can simply copy and paste this second bit of data into the area where you want the form to be on your page. (i.e. sidebar)
Interesting how it works in details?
The java script generated acts when “submit” button is clicked. It builds the <form> on the fly, and then submits it to the server. Then it removes the form from the page.
Script sample:
<script type="text/javascript">
//this function being called by submit button click and prepare the data.
function postdata() {
var url='http://targetURL'; //the URL which regulary contained in the <form> “action” attribute.
Here we getting user input value
var EmailAddress1 = document.getElementById("mbz_EmailAddress").value;
var FirstName2 = document.getElementById("mbz_FirstName").value;//this one does the magic
postwith(url, {EmailAddress : EmailAddress1,FirstName : FirstName2});}
//this function actually does build the form and submits it to the server.
function postwith(to, p) {
var myForm = document.createElement("form");
myForm.method = "post";
myForm.action = to;
for (var k in p){
var myInput = document.createElement("input");
myInput.setAttribute("name", k);
myInput.setAttribute("id", k);
myInput.setAttribute("value", p[k]);
myForm.appendChild(myInput);
}
document.body.appendChild(myForm);
myForm.submit();
document.body.removeChild(myForm);
}
</script>
Form sample:
<div name="subscribe">
<label id="mbz_optintitle">Subscribe to our mailing list</label>
<input size="30" value="Email Address (required)" name="EmailAddress" class="required email" id="mbz_EmailAddress" type="email">
<input size="30" value="First Name (required)" name="FirstName" class="required text" id="mbz_FirstName" type="text">
<input type="button" value="Subscribe" name="subscribe" id="mb-embedded-subscribe" class="button" onclick="postdata();">
</div>